ラズパイのフォントで機械学習する文字認識プログラム例
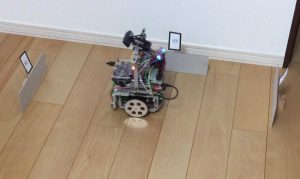
機械学習の教科書ではMNISTの手書き数字のデータベースを使った手書き数字認識プログラムが紹介されている。これを、Raspberry Piで動かす2輪走行のラズマウスの走行指示に応用する。ラズマウスの前にUSB接続のWEBカメラを取付け、これでキャプチャした前方の数字標識を認識し、その数字で指示された次の動作(左右回転、Uターンなど)を実行する。しかし、数字標識をパソコンのフォントで印刷した文字を使うと、手書き文字で学習した認識プログラムでは誤認識が発生しやすい。
今回は、手書き文字ではなく、ラズパイが持っているフォント数字を学習させることで、かなり高い精度でパソコンのフォント印字数字を認識できたので、その学習プログラムを紹介する。
●完成したラズパイのフォントで学習した文字認識事例
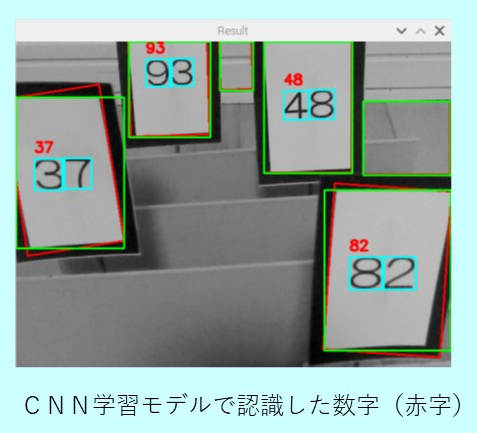
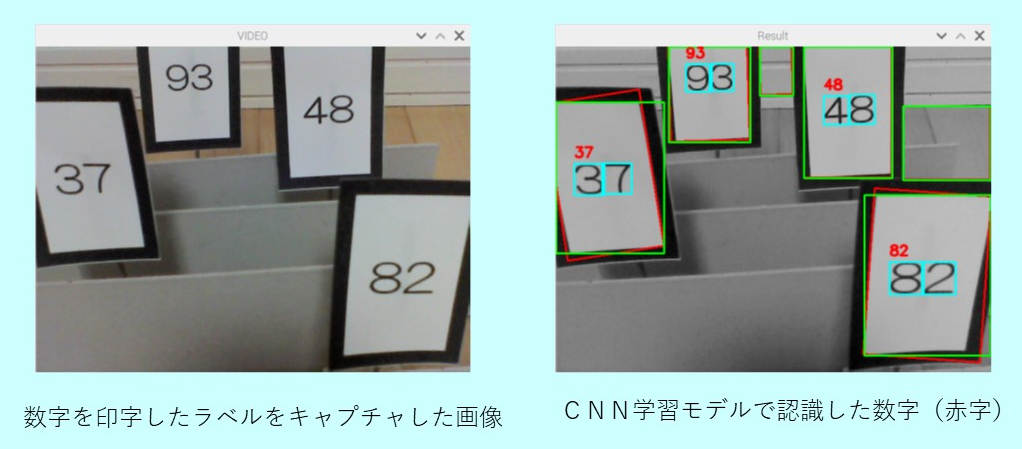
ラズパイにWEBカメラを接続して、「D」キーを押した時にキャプチャした画像を認識プログラムで数字を認識する。この事例は、CNN(Convolution Neural Network)モデルで学習したプログラムで認識したもの。数字標識を示す4cm(W) x 6cm(H)のラベル内に、数字を印字(何桁でもよいがこの場合2桁数字)、その数字を認識(ブルーで外形輪郭)させ、その数字を赤字で表示。MLP(multi Layer Perceptron)モデルでも実施したが、同じ結果が得られた。以下に、ラズパイのフォントの選択、文字サンプルの作成、学習モデルの作成(CNNとMLP)、認識プログラム事例について、記載する。

●ラズパイのプログラム環境
深層学習(ディープラーニング)のプログラムを作る時に必要なモジュールをインストールする必要があるが、今回はRaspberry Pi 4BにフルセットでRaspberry Pi OSをインストールし、必要なモジュールTensorflow, Keras, sklearn, OpenCVをインストールした。最新のTensorflowにはKerasが含まれているが、ここでは単独Kerasをインストールして使った。
<使用したラズパイ>
Raspberry Pi 4B(4GB) :MicroSDHC(32GB)、Raspberry Pi OS
<各モジュールのバージョン>
Tensorflow : 1.14.0 (tensorflow.keras : 2.2.4 tf)
Keras : 2.3.1 OpenCV : 3.2.0
●フォント文字認識の学習ステップ
(1)ラズパイの標準フォントから認識に使えるフォントを選択
(2)学習用フォントの作成
(3)学習モデルの構築と保存
(4)学習モデルを使った文字認識
●ラズパイのフォントの選択
フォントの数字(0~9)を学習させるために、ラズパイに標準でインストールされているTTFフォントで「8」の数字を表示させ、記号などのフォントを除いた学習に適切なフォントを選択し、そのフォントファイル名を”RasFontList.txt”に保存した。今回は225のTTFフォントファイルが得られた。
<ラズパイのフォントの選択のプログラム例> RasFontSelect.py
# -*- coding: utf-8 -*-
# Raspberry pi のフォントの中から学習するフォントを選択して
#    フォントファイルを'RasFontList.txt'ファイルに保存する
import os, glob
from PIL import Image, ImageDraw, ImageFont
import numpy as np
import cv2

dispNo = 8	# '8'の文字を描画して、採用の有無を確認する
ttfFolder = glob.glob("/usr/share/fonts/truetype/*")
    # Raspberry Piでは、フォントファイルは/truetype/の下位folderに入っている

def drawText(font, text):	# 200x200pixcelの画像の中央に文字を描画
    img = Image.new("L", (200,200))	# "L": 8 bit pix GrayScale
    draw = ImageDraw.Draw(img)		# Create object
    imgSize = np.array(img.size)
    fontSize = np.array(font.getsize(text))
    xy = (imgSize - fontSize) / 2
    draw.text(xy, text, font=font, fill=(255))
    return np.asarray(img)

ttfList = []
for fontFolder in ttfFolder:
    ttfList += glob.glob(fontFolder+'/*.ttf')
print("Nunber of Fonts = ", len(ttfList))

fp = open('RasFontList.txt', 'w', encoding='utf-8')
cv2.namedWindow('Font', cv2.WINDOW_AUTOSIZE)

for fname in ttfList:
    try:
        font = ImageFont.truetype(fname, size=100)
    except:
        continue
    imgArray = drawText(font, str(dispNo))
    cv2.imshow('Font',imgArray)
    k = cv2.waitKey(0)
    if k & 0xFF == ord('q'):         # プログラム終了
        print("Quit !! ")
        break
    elif k & 0xFF == ord('y'):		# ファイル保存
        fp.write(fname+'\n')
        print("Saved = ", fname)
    elif k & 0xFF == ord('n'):		# ファイル保存せず次の画像を処理
        print("Skip = ", fname)

cv2.destroyAllWindows()
fp.close()
●学習用フォントの作成
MNISTの手書き文字画像データと同じように、28 x 28 pixelの学習用フォント画像データを作る。フォント数が225しかないので、各数字を回転、拡大・縮小の画像処理を施して、学習データを水増しし、データを”./image/RasFontSample.npz”に保存。サンプルデータ数は63750件とした。
<プログラム例> RasFontSampleCreate.py
# -*- coding: utf-8 -*-
# 'RasFontList.txt'のフォントを使って、0〜9の画像(28x28pixel)を描画して
# (X,Y)データとして、 "./image/RasFontSample.npz" ファイルに保存する

import os, glob
from PIL import Image, ImageDraw, ImageFont
import numpy as np
import cv2
import time
import random

# サイズの指定
imageSize = 28 # 28x28 pixel
fontListFile = "RasFontList.txt"	# Font File Name List
fontDrawFileName = "./image/RasFontSample.npz"
sampleImgFolder = "./image/sample"

# 中央に文字を描画
def drawText(img, font, text):
    draw = ImageDraw.Draw(img)
    imgSize = np.array(img.size)	# img.size=(w, h)
    fontSize = np.array(font.getsize(text))	# font.getsize = (w, h)
    xy = (imgSize - fontSize) / 2		# xy = np.array(x,y)
    draw.text(xy, text, font=font, fill=(255))

# 回転、拡大でデータを増やす
def genImage(baseImg, no, fontName):
    for ang in range(-20, 21, 2):
        subImg = baseImg.rotate(ang)
        data = np.asarray(subImg)
        X.append(data)
        Y.append(no)
        w = imageSize
        for ratio in range(8, 15, 3):	# 拡大
            size = round((ratio/10) * imageSize)
            im2 = cv2.resize(data, (size, size), cv2.INTER_AREA)
            data2 = np.asarray(im2)
            if imageSize > size:
                x = (imageSize - size) // 2
                data = np.zeros((imageSize, imageSize), dtype = np.uint8)
                data[x:x+size, x:x+size] = data2
            else:
                x = (size - imageSize) // 2
                data = data2[x:x+w, x:x+w]
            X.append(data)
            Y.append(no)
            if random.randint(0, 400) == 0:
                fname = "image/numPi/{}({})-{}-{}.png".format(fontName[:-4], no, ang, ratio)
                cv2.imwrite(fname, data)

# サンプル画像を出力するフォルダ(ランダムに抽出した画像)参考用
if not os.path.exists(sampleImgFolder):
    os.makedirs(sampleImgFolder)

# X:画像データ、Y:画像の数字
X = []
Y = []

# フォントファイル名の読み出し
fp = open(fontListFile, 'r', encoding='utf-8')
ttfList = []
for fname in fp:
    fname = fname.rstrip()
    ttfList.append(fname)
fp.close()

for path in ttfList:
    fontName = os.path.basename(path)
    try:
        font = ImageFont.truetype(path, size=100)
    except:
        continue
    for no in range(10):
        img = Image.new("L", (200,200))	# "L": 8 bit pixel, Black & White, (width, height)
        drawText(img, font, str(no))	#中央に文字を表示
        imga = np.asarray(img)
        blur = cv2.GaussianBlur(imga, (5, 5), 0) # ぼかす
        thImg = cv2.adaptiveThreshold(blur, 255, 1, 1, 11, 2) # 二値化
        thImg, contours, hierarcy = cv2.findContours(thImg, cv2.RETR_EXTERNAL, cv2.CHAIN_APPROX_SIMPLE)
        if len(contours) < 1:
            print("No contours !!")
            continue
        for cnt in contours:
            x, y, w, h = cv2.boundingRect(cnt)	#文字輪郭の外形矩形
            if w < 10 or h < 10:	# 小さい輪郭などノイズ除去
                continue
            num = imga[y:y+h, x:x+w] # 部分画像を得る
            ww = max(w, h)
            wx = (ww - w) // 2
            wy = (ww - h) // 2
            spc = np.zeros((ww, ww), dtype = np.uint8)	# 文字が正方形画像に最大に入るように空白画像を作る
            spc[wy:wy+h, wx:wx+w] = num # 文字を中央にコピー
            num = cv2.resize(spc, (imageSize, imageSize), cv2.INTER_AREA)	# 28x28pixel
            # 標準の形状をデータに追加
            X.append(num)
            Y.append(no)
            baseImg = Image.fromarray(np.uint8(num))
            genImage(baseImg, no, fontName)	# 回転、拡大してデータを水増しして、X,Yに追加

X = np.array(X)
Y = np.array(Y)
np.savez(fontDrawFileName, x=X, y=Y)
print("The Number of data = ", len(Y))
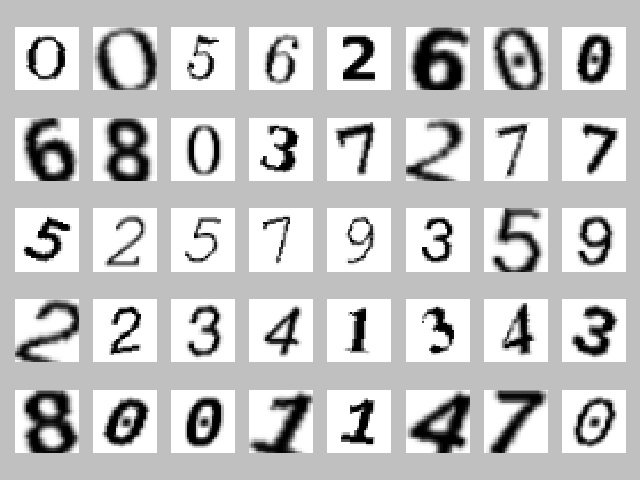
<フォント画像サンプルの事例>
●学習モデルの構築と保存
MLPとCNNの2種類の学習モデルを構築し、それぞれのモデルを、”RasFontModel_MLP_E5.h5”,と “RasFontModel_CNN_E5.h5”のファイル名で保存した。このモデル構築にあたって、「Pythonで動かして学ぶ!あたらしい機械学習の教科書(伊藤真著)翔泳社」を参考にした。
◆MLPモデル
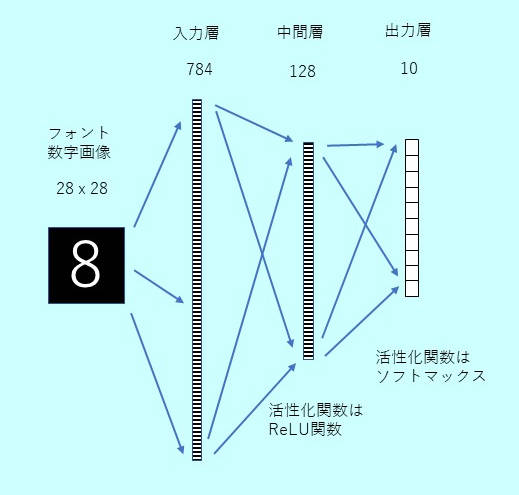
28 x 28の画像データを784の長さのベクトルとして扱い、63750 x 28 x 28の配列を63750 x 784の配列に変換。入力は784次元のベクトル、128個の中間層、出力層は10種類の数字の分類ができるように、10個のニューロンとし、それぞれのニューロンの出力値が確率を表すように活性化関数にはソフトマックスを使った。中間層の活性化関数はReLUを使った。訓練データとテストデータはsklearnのmodel_selection.train_test_splitを使って分けた。中間層の個数を512個にしたり、2層に増やしたり、Dropoutを入れたりしたが、結果に大差はなかった。保存された次の学習モデルファイルを使って、文字認識を実行する。
(MLP文字認識学習モデル)RasFontModel_MLP_E5.h5
<プログラム例> RasFontLearnMLP.py
# -*- coding: utf-8 -*-
# TensorFlow Ver. 1.14.0
# Keras Ver. 2.3.1(単独KERAS, tensorflow.keras(Ver2.2.4)でない)
from keras.models import Sequential
from keras.layers import Dense, Dropout, Activation, Flatten, Activation
from keras.layers import Conv2D, MaxPooling2D
from keras.optimizers import SGD, Adam, RMSprop
from keras.utils import np_utils
from sklearn import model_selection	# 学習/テストデータの仕分けに使う
import numpy as np
import time
import os

imageW = 28
imageH = 28

def buildModelMLP():
    # MLPのモデルを構築
    model = Sequential()
    #model.add(Dense(512, input_shape=(imageW * imageH,)))
    model.add(Dense(128, input_shape=(imageW * imageH,)))
    model.add(Activation('relu'))
    #model.add(Dropout(0.2))

    #model.add(Dense(512))
    #model.add(Activation('relu'))
    #model.add(Dropout(0.2))

    model.add(Dense(10))
    model.add(Activation('softmax'))

    model.compile(loss='categorical_crossentropy',
        optimizer=RMSprop(),
        metrics=['accuracy'])
    return model

if __name__ == '__main__':
    import matplotlib.pyplot as plt

    fontDrawFileName = "./image/RasFontSample.npz"
    saveModelFile = "./RasFontModel_MLP_E5.h5"

    if not os.path.exists(fontDrawFileName):
        print("Font Draw File does not exist")
        exit()
    sTime = time.time()

    # フォント画像のデータを読む
    xy = np.load(fontDrawFileName)
    X = xy["x"]
    Y = xy["y"]
    # データを正規化
    X = X.reshape(X.shape[0], imageW * imageH).astype('float32')
    X /= 255
    Y = np_utils.to_categorical(Y, 10)		# 0 - 9: 10 classes
    # 訓練データとテストデータに分割
    X_train, X_test, Y_train, Y_test = model_selection.train_test_split(X, Y)
    # モデルを構築
    model = buildModelMLP()
    history = model.fit(X_train, Y_train,
                        batch_size=128, epochs=5, verbose=1,
                        validation_data=(X_test, Y_test))
    # モデルを保存
    model.save(saveModelFile)

    # モデルを評価
    score = model.evaluate(X_test, Y_test, verbose=0)
    print("Test Loss = {},  Test Accuracy = {}".format(score[0], score[1]))
    print('Conputation Time = ', time.time() - sTime)

    # 学習過程をグラフ化
    plt.figure(1, figsize = (12, 3))
    plt.subplots_adjust(wspace=0.5)

    plt.subplot(1,2,1)
    plt.plot(history.history['loss'], 'black', label='training')
    plt.plot(history.history['val_loss'], 'red', label='test')
    plt.legend()

    plt.subplot(1,2,2)
    plt.plot(history.history['accuracy'], 'black', label='training')
    plt.plot(history.history['val_accuracy'], 'red', label='test')
    plt.legend()

    plt.show()
<実行結果>
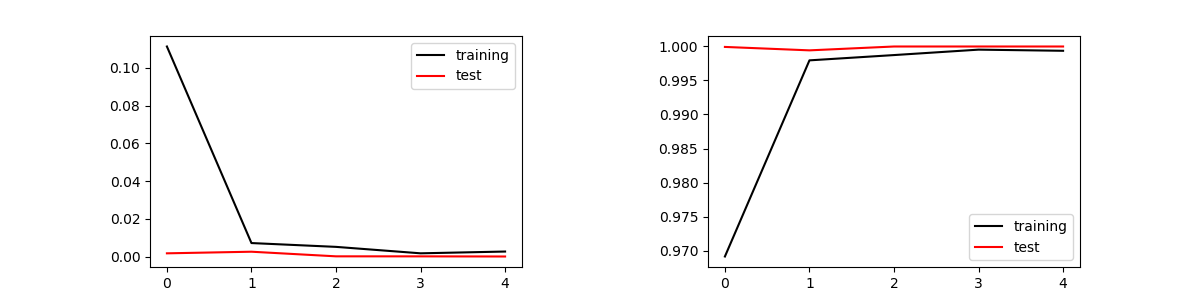
Train on 47812 samples, validate on 15938 samples
Epoch 1/5
47812/47812 [==============================] - 6s 126us/step - loss: 0.1364 - accuracy: 0.9761 - val_loss: 0.0073 - val_accuracy: 0.9997
Epoch 2/5
47812/47812 [==============================] - 6s 127us/step - loss: 0.0041 - accuracy: 0.9995 - val_loss: 0.0028 - val_accuracy: 0.9993
Epoch 3/5
47812/47812 [==============================] - 6s 121us/step - loss: 8.5525e-04 - accuracy: 0.9999 - val_loss: 4.1320e-04 - val_accuracy: 1.0000
Epoch 4/5
47812/47812 [==============================] - 6s 121us/step - loss: 2.8171e-04 - accuracy: 1.0000 - val_loss: 3.2225e-04 - val_accuracy: 0.9999
Epoch 5/5
47812/47812 [==============================] - 6s 117us/step - loss: 9.7581e-05 - accuracy: 1.0000 - val_loss: 1.2662e-04 - val_accuracy: 1.0000
Test Loss = 0.00012662290412123294,  Test Accuracy = 1.0
Conputation Time =  33.15349531173706
誤差と正答率は次の様になった。訓練データは47812個、バッチサイズは128なので、1エポックで374回のパラメータ更新が行われる。エポックは5で十分収束し、オーバーフィッティングも起きていない。
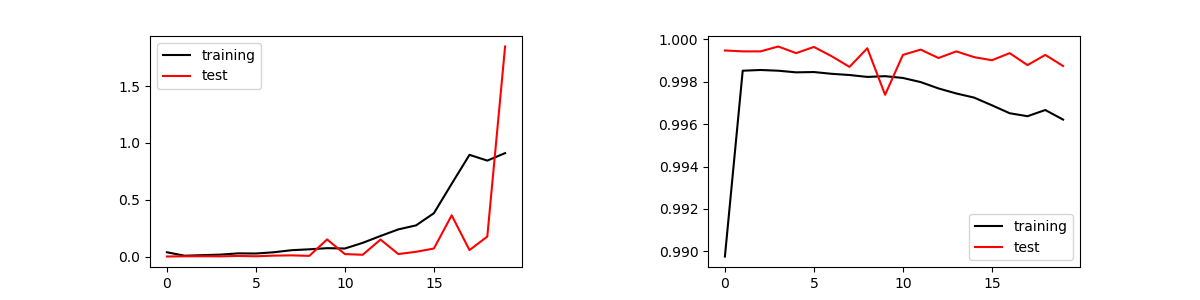
次の学習結果は、512個の中間層を2層設け、それぞれDropoutを0.2としたモデルで、エポックを20とした場合。エポックが5以上になるとオーバーフィッティングが発生している。
◆CNNモデル
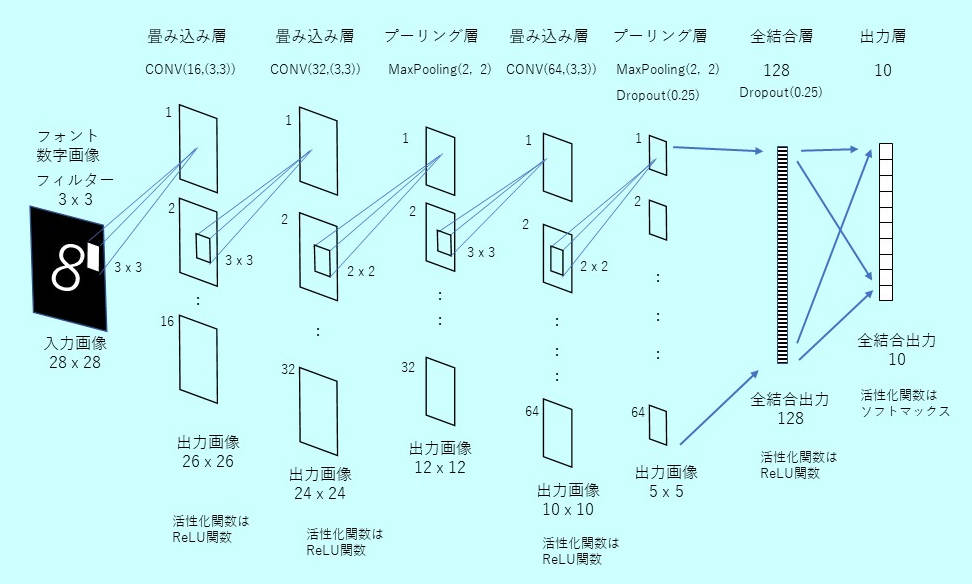
1層目、2層目は畳み込み層、3層目はマックスプーリング層、4層目は畳み込み層、5層目でマックスプーリング層を入れ、6層目は128個の全結合、最後の7層目は出力が10個の全結合層となる。
ラズパイではこの計算に約1時間かかった。同じプログラムをWindows10 PCで走らせると、古いPC(Intel-i7:4core)でも10分程度で完了した。MLPと同様にエポックが5で収束し正答率は100%となった。保存された次の学習モデルファイルを使って、文字認識を実行する。
(CNN文字認識学習モデル)RasFontModel_CNN_E5.h5
<プログラム例> RasFontLearnCNN.py
# -*- coding: utf-8 -*-
# TensorFlow Ver. 1.14.0
# Keras Ver. 2.3.1(単独KERAS, tensorflow.keras(Ver2.2.4)でない)
from keras.models import Sequential
from keras.layers import Dense, Dropout, Activation, Flatten, Activation
from keras.layers import Conv2D, MaxPooling2D
from keras.optimizers import Adam
from keras.utils import np_utils
from sklearn import model_selection	# 学習/テストデータの仕分けに使う
import numpy as np
import time
import os

imageW = 28
imageH = 28

def buildModelCNN():
    # CNNのモデルを構築
    model = Sequential()
    model.add(Conv2D(16, (3, 3), input_shape=(28, 28, 1), activation='relu'))
    model.add(Conv2D(32, (3, 3), activation='relu'))
    model.add(MaxPooling2D(pool_size=(2, 2)))

    model.add(Conv2D(64, (3, 3), activation='relu'))
    model.add(MaxPooling2D(pool_size=(2, 2)))
    model.add(Dropout(0.25))

    model.add(Flatten())
    model.add(Dense(128, activation='relu'))
    model.add(Dropout(0.25))

    model.add(Dense(10, activation='softmax'))

    model.compile(loss='categorical_crossentropy',
                optimizer=Adam(),
                metrics=['accuracy'])
    return model

if __name__ == '__main__':
    import matplotlib.pyplot as plt

    fontDrawFileName = "./image/RasFontSample.npz"
    saveModelFile = "./RasFontModel_CNN_E5.h5"
    if not os.path.exists(fontDrawFileName):
        print("Font Draw File does not exist")
        exit()
    sTime = time.time()

    # フォント画像のデータを読む
    xy = np.load(fontDrawFileName)
    X = xy["x"]
    Y = xy["y"]
    # データを正規化
    X = X.reshape(X.shape[0], imageW, imageH, 1).astype('float32')
    X /= 255
    Y = np_utils.to_categorical(Y, 10)		# 0 - 9: 10 classes
    # 訓練データとテストデータに分割
    X_train, X_test, Y_train, Y_test = model_selection.train_test_split(X, Y)
    # モデルを構築
    model = buildModelCNN()
    history = model.fit(X_train, Y_train,
                        batch_size=128, epochs=5, verbose=1,
                        validation_data=(X_test, Y_test))
    # モデルを保存
    model.save(saveModelFile)

    # モデルを評価
    score = model.evaluate(X_test, Y_test, verbose=0)
    print("Test Loss = {},  Test Accuracy = {}".format(score[0], score[1]))
    print('Conputation Time = ', time.time() - sTime)

    # 学習過程をグラフ化
    plt.figure(1, figsize = (12, 3))
    plt.subplots_adjust(wspace=0.5)

    plt.subplot(1,2,1)
    plt.plot(history.history['loss'], 'black', label='training')
    plt.plot(history.history['val_loss'], 'red', label='test')
    plt.legend()

    plt.subplot(1,2,2)
    plt.plot(history.history['accuracy'], 'black', label='training')
    plt.plot(history.history['val_accuracy'], 'red', label='test')
    plt.legend()

    plt.show()
<実行結果>
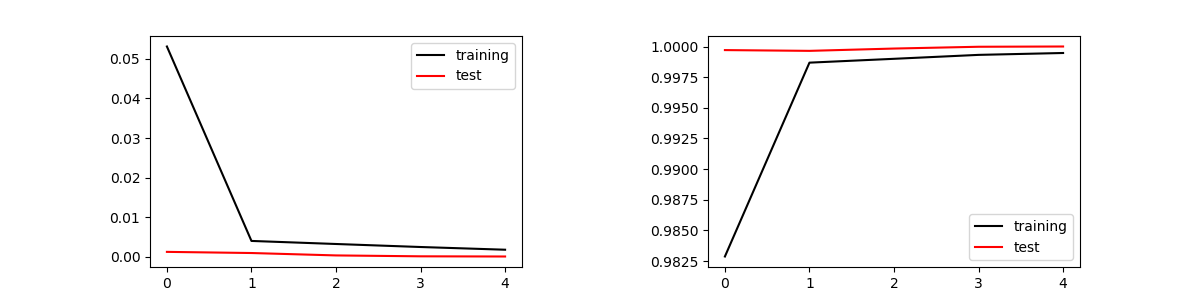
Train on 143437 samples, validate on 47813 samples
Epoch 1/5
143437/143437 [==============================] - 703s 5ms/step - loss: 0.0531 - accuracy: 0.9829 - val_loss: 0.0013 - val_accuracy: 0.9997
Epoch 2/5
143437/143437 [==============================] - 720s 5ms/step - loss: 0.0040 - accuracy: 0.9987 - val_loss: 9.8346e-04 - val_accuracy: 0.9996
Epoch 3/5
143437/143437 [==============================] - 739s 5ms/step - loss: 0.0033 - accuracy: 0.9990 - val_loss: 3.7658e-04 - val_accuracy: 0.9998
Epoch 4/5
143437/143437 [==============================] - 731s 5ms/step - loss: 0.0025 - accuracy: 0.9993 - val_loss: 1.5103e-04 - val_accuracy: 1.0000
Epoch 5/5
143437/143437 [==============================] - 726s 5ms/step - loss: 0.0018 - accuracy: 0.9995 - val_loss: 1.0530e-04 - val_accuracy: 1.0000
Test Loss = 0.00010529663525706608,  Test Accuracy = 1.0
Conputation Time =  3706.589527606964
●学習モデルを使った文字認識
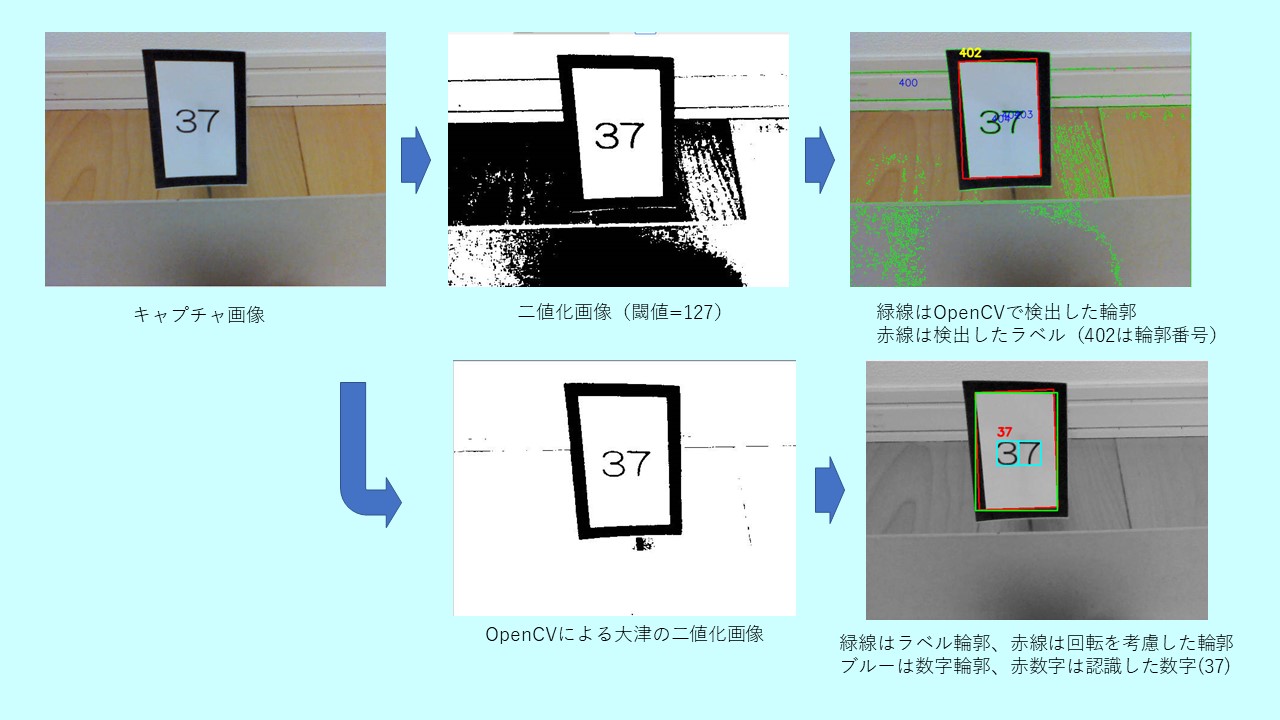
ラズパイにUSB接続WEBカメラ(BSWHD06M:バッファロー製, 120万画素)を取付けOpenCVのビデオキャプチャで画像を取り込んだ。取り込んだ画像は、640 x 480 pixel。認識する数字は、4cm(W) x 6cm(H)の黒縁ラベル内にPCフォントで黒色印刷。黒縁ラベルに印字したのは、どのような背景でもOpenCVで容易に輪郭抽出できるからである。
<プログラムの構成>
(1)keras.modelsのload_modelで学習モデル(MLP または CNN)を読込む
(MLP文字認識学習モデルを使う場合)RasFontModel_MLP_E5.h5
(CNN文字認識学習モデルを使う場合)RasFontModel_CNN_E5.h5
(2)カメラでキャプチャした画像からラベル画像を抽出
(3)各ラベル画像の中から文字輪郭を抽出し、フォント文字学習モデルで数字を認識
認識する画像処理にOpenCVの「大津の二値化」を使った。
<プログラム例> RasRecogNum.py
# -*- coding: utf-8 -*-
import numpy as np
import cv2
from operator import itemgetter		# sortのため
from keras.models import load_model

# MLP/CNNの切り替え
AI_TYPE = 'MLP'
#AI_TYPE = 'CNN'

if AI_TYPE == 'MLP':		# 学習モデル:epochs=5,MLP-Model
    saveModelFile = "./RasFontModel_MLP_E5.h5"
else:	# AI_TYPE == 'CNN'	# 学習モデル:epochs=5,CNN-Model
    saveModelFile = "./RasFontModel_CNN_E5.h5"

model = load_model(saveModelFile)

minWidth = 28 	# 検出ラベルの最低幅 = 30 (認識文字=28x28, 1個分)
maxWidth = 320	# 検出ラベルの最大幅 : 全画面の比率 (640 * 50%)
minHeight = 28 	# 検出ラベルの最低高 = 30 (認識文字=28x28, 1個分)
maxHeight = 400	# 検出ラベルの最大高 : 全画面の比率 (480 * 50%)

font = cv2.FONT_HERSHEY_SIMPLEX
cap = cv2.VideoCapture(0)

def transImage(imgColor):
    imgGray = cv2.cvtColor(imgColor, cv2.COLOR_BGR2GRAY)	# 入力画像をグレースケール化
    imgBlur = cv2.GaussianBlur(imgGray, (5, 5), 0)	# 5x5のgaussianフィルターでノイズ抑制
    retVal, imgOtsu = cv2.threshold(imgBlur, 0, 255, cv2.THRESH_BINARY + cv2.THRESH_OTSU)	# 大津の二値化
    return imgGray, imgOtsu

def detectContCenter(cnt):
    # 輪郭図形の重心(cx, cy)を求める。
    cx, cy = 0, 0
    M = cv2.moments(cnt)
    if abs(M['m00']) > 0:	# ≒ 0
        cx = int(M['m10']/M['m00'])		# col
        cy = int(M['m01']/M['m00'])		# row
    return cx, cy

def detectLabelContours(imgThresh):
    # 2値化画像からv、ラベル(数字を含む)の輪郭を検出して、輪郭リストcontAttrを返す
    rowMax, colMax = imgThresh.shape[:2]		#入力画像のサイズ
    imgThresh, contours, hierarchy = cv2.findContours(imgThresh, cv2.RETR_TREE, cv2.CHAIN_APPROX_SIMPLE)	# 輪郭検出
    contLabelAttr=[]
    for i in range(len(contours)):		# 輪郭の外形矩形の取得
        if hierarchy[0][i][3] > 0:		# hierarchyの親がなし(-1)、親parentが0の輪郭のみ抽出
            continue
        cnt = contours[i]
        boundR = cv2.boundingRect(cnt)		#回転を考慮しない最大輪郭を囲む外接矩形
        (xb, yb, wb, hb) = boundR	# 外接矩形:左上の点(xb,yb)、幅wb、高さhb(int型)
        conArea = cv2.contourArea(cnt)  # 輪郭の面積計算(単位がピクセルではない)
        rectR = cv2.minAreaRect(cnt)	#回転を考慮した外接矩形:面積は実態に近い
            # rectR= ((x,y), (w,h), angle)  (float型)
        box = cv2.boxPoints(rectR)	# 4角のコーナーの座標
        boxNP = np.int0(box)	# 整数に。[[x1,y1],[x2,y2],[x3,y3],[x4,y4]]
        conBoxArea = cv2.contourArea(boxNP)  # 外接矩形(box)の面積計算 → 単位はピクセルではない
        if wb < minWidth or wb > maxWidth:	# ラベル幅の制限
            continue
        if hb < minHeight or hb > maxHeight:	# ラベル高さの制限
            continue
        cx, cy = detectContCenter(cnt)	# 輪郭のセンター(cx, cy)
        if conArea < conBoxArea  * 0.8:		# 輪郭面積と、輪郭を囲む矩形面積の差が大きい(複雑形状)は除外
            continue
        contLabelAttr.append([i, cx, cy, boxNP, boundR])
    return contours, contLabelAttr	# 全ての輪郭データ、ラベルに適合する輪郭リストを返す

def detectMojiFromLabel(imgThreshLbl, outX, outY):
    # 文字を含むラベル2値化画像(imgThreshLbl)から、文字輪郭リスト(mojiRectList)を返す
        # mojiRectList:文字を囲む矩形座標のリスト(複数の文字が含まれる)
        # 入力画像の周辺にノイズがあるので周辺は除外。outX, outY:除外する端の割合(0.15, 0.2)
    imgThreshLbl, contours, hierarchy = cv2.findContours(imgThreshLbl, cv2.RETR_TREE, cv2.CHAIN_APPROX_SIMPLE)
        # hierarchy[Next, previous, Child, parent]で、-1でない、一番小さいparent Noを持つ
        # contoursが文字輪郭。parent Noが 0(ゼロ)でない場合があるので、最小parent Noを探す
    # 文字輪郭の検出
    wjMin, hjMin = 2, 8 	#最小文字サイズを確認。 '1'の場合は幅が狭いので2ptでも検出する必要がある
    #文字センターがラベル中央にあるかを確認
    imgR, imgC = imgThreshLbl.shape[:2]
    cxMin = int(imgC * outX)	# 0.15
    cxMax = int(imgC * (1.0 - outX))
    cyMin = int(imgR * outY)	# 0.2
    cyMax = int(imgR * (1.0 - outY))
    parentMinNo = 100000		# parent No 最小値
    mojiContList=[]		# 最小のparent Noを持つcontoursのリスト(複数のcontoursが存在)
    mojiRectList = []		# 戻り値:文字の外形座標リスト
    if len(contours) > 0:		# 文字輪郭がある時、文字の外形の座標を抽出(複数の文字外型座標リストを作成)
        for i in range(len(contours)):
            parentNo = hierarchy[0][i][3]	# 0:Next, 1:Prev, 2:Child, 2:Parent
            if parentNo == parentMinNo:
                mojiContList.append(contours[i])
            elif parentNo != -1 and parentNo < parentMinNo:	# 通常、親番号は0(ゼロ)だが、0以上の場合もあり、最小値を親とする
                parentMinNo = parentNo
                mojiContList=[]	# 親番号が変わった時に、リストをクリア
                mojiContList.append(contours[i])
        for i in range(len(mojiContList)):		# 最小のparent Noを持つcontoursのリスト(複数のcontoursが存在)
            (xj, yj, wj, hj) = cv2.boundingRect(mojiContList[i])	#(x, y , w, h) = 外接矩形の座標を示すタプル。int型
            cx, cy = detectContCenter(mojiContList[i])		# 輪郭図形の重心(cx, cy)を求める
            if (cxMin < cx and cx < cxMax) and (cyMin < cy and cy < cyMax):	# 文字輪郭センターがノイズを除く内側にあればOK
                if wj >= wjMin and  hj >= hjMin:	# エリアがwjMin x hjMin より大きいならOK(小さなノイズを除去)
                    ptj1 = (xj, yj)
                    ptj2 = (xj + wj, yj + hj)
                    mojiRectList.append([ptj1, ptj2])			# 文字輪郭の外形矩形の取得
    return mojiRectList

def cutImgLabel(labelAttr, img):
    # ラベル画像を切り出し、ラベルの画像を返す(ColorでもGrayScaleでもOK)入力画像に従う
    no, cx, cy, boxNP, (xb, yb, wb, hb) = labelAttr
    pt1 = (xb, yb)
    pt2 = (xb + wb, yb + hb)
    imgLabel = img[pt1[1] : pt2[1], pt1[0] : pt2[0]]		# ラベル画像の切り出し [row1 : row2, col1 : col2]
    return imgLabel

def makeAImg(imgIn, ptj1, ptj2):
    # 入力画像(imgIn)から、文字部分を切り出し認識できる画像(imgAI)28x28pixelに加工
    if ((ptj2[1] - ptj1[1]) > 0) and ((ptj2[0] - ptj1[0]) > 0):
        imgIn = cv2.bitwise_not(imgIn)		# 白黒反転(文字は白)のみ、 28 x 28 画像では膨張なしの方が認識が良好
        #矩形画像の切り出し
        imgCrop = imgIn[ptj1[1]:ptj2[1], ptj1[0]:ptj2[0]]		# [row1:row2, col1:col2]
        w = ptj2[0] - ptj1[0]
        h = ptj2[1] - ptj1[1]
        # 正方形の中に数字を描画
        ww = round(max([w, h]) * 1.1) 	# w, hの大きい方の長さwwで正方形画像、余白10%
        spc = np.zeros((ww, ww), dtype=np.uint8)		# 画像を黒に
        wy = (ww-h)//2	#高さ方向の余白を計算
        wx = (ww-w)//2	#幅方向の余白を計算
        spc[wy:wy+h, wx:wx+w] = imgCrop	# 余白の内側に文字画像を入れる
        imgAI = cv2.resize(spc, (28, 28)) # 28x28のサイズに揃える

        if AI_TYPE == 'MLP':	# データを正規化:(MLPの場合、入力は784列)
            imgAI = imgAI.reshape(28*28)
        else:# 'CNN'	 データを正規化:(CNNの場合、入力画像は28x28x1(mono color))
            imgAI = imgAI.reshape(28, 28, 1)
        imgAI = imgAI.astype("float32") / 255
        stat = True
    else:
        print("切り出し画像無", (ptj1[0] , ptj1[1]), (ptj2[0],  ptj2[1]))
        imgAI = imgIn.copy()
        stat = False
    return stat, imgAI

def recognizeNumber(mojiRectList, imgThreshLbl):
    # ラベル2値化画像(imgThreshLbl)から、認識文字輪郭外形ローカル座標:mojiRectList=[[ptj1(x,y), ptj2(x,y)],.......]=
    # 認識文字があれば、MPL/CNNで認識し、左から順に並べた数字(strNo)と文字リスト(recogNoList)を返す
        # 戻値recogNoList ={"posX", "rectPos", "No"} dict type,座標はラベル内ローカル座標
    print("Number of Moji to be Recognized(Main) =", len(mojiRectList))
    recogNoList = []	#	dictionary of detected number and position:{"posX", "rectPos, "No"]
    for i in range(len(mojiRectList)):	# 認識すべき文字輪郭数
        ptj1, ptj2 = mojiRectList[i]	# ptj1, ptj2はラベル内でのローカル座標
        statOK, imgAI = makeAImg(imgThreshLbl, ptj1, ptj2)	# MLP/CNNで適用する画像サイズに変換
        if statOK:
            probArray = model.predict(np.array([imgAI]))	# 入力はimgのリスト、1個だけなので[imgAI]
            result = probArray.argmax()	# probArrayは0-9の確率 1 x 10 のnp.array 最大値が検出文字
            print("NUMBER = ", result)	# resultの確率 = probArray[0][result])
            recogNo ={"pos1X":ptj1[0], "pos1Y":ptj1[1], "pos2X":ptj2[0], "pos2Y":ptj2[1], "No":result}
            recogNoList.append(recogNo)
    strNo = ""		# strNo:ラベル内認識数字
    if len(recogNoList) > 0:
        recogNoList = sorted(recogNoList, key = itemgetter("pos1X"))	# 左から順に数字を並べる
        for k in range(len(recogNoList)):
            strNo += str(recogNoList[k]["No"])
        print("Detected No =", strNo)
    else:
        print("NG! 認識文字なし")
    return strNo, recogNoList

def drawResult(allContours, contLabelAttr, recogListInLabel, imgColor, imgGray, imgThresh):
    # recogListInLabel:(labelNo, strNo, recogNoList)
        # strNo:認識した複数の数字(str型)、
        # recogNoList:検出数字リスト(左から順に)、Dict型{"pos1X", "pos1Y", "pos2X", "pos2Y", "No"}
    imgColor = cv2.drawContours(imgColor, allContours, -1, (0,255,0), 1)	# 全ての輪郭を「グリーン」で描画
    for i in range(len(allContours)):	# allContoursの輪郭番号を描画
        boundR = cv2.boundingRect(allContours[i])		#回転を考慮せず最大輪郭を囲む外接矩形
            # タプルboundR= (x, y , w, h)=外接矩形の左上の点。int型
        (xb, yb, wb, hb) = boundR
        if wb < minWidth or wb > maxWidth:	# ラベル幅の制限
            continue
        if hb < minHeight or hb > maxHeight:	# ラベル高さの制限
            continue
        cx, cy = detectContCenter(allContours[i])
        cv2.putText(imgColor, str(i), (cx, cy), font, 0.6, (255, 0, 0), 1, cv2.LINE_AA, False)

    imgThreshColor = cv2.merge((imgThresh, imgThresh, imgThresh))	# 認識用二値化画像をカラー化して結果表示
    color = (255, 255, 0)
    for i in range(len(contLabelAttr)):	# 検出したラベル
        no, cx, cy, boxNP, (xb, yb, wb, hb) = contLabelAttr[i]
        pt1 = (xb, yb)
        pt2 = (xb + wb, yb + hb)
        imgColor = cv2.drawContours(imgColor,[boxNP],0,(0,0,255),2)	# 検出ラベル(box形状)を赤で囲む
        pttxt = (xb, yb-10)
        cv2.putText(imgColor, str(no), pttxt, font, 0.7, (0, 255, 255), 2, cv2.LINE_AA, False)
        imgGrayColor = cv2.drawContours(imgThreshColor,[boxNP],0,(0,0,255),2)	# 検出ラベルを赤で囲む
        cv2.rectangle(imgThreshColor, pt1, pt2, (0, 255, 0), 2)	# 検出ラベル外形矩形をグリーンで囲む

    for i in range(len(recogListInLabel)):
        labelNo, strNo, recogNoList = recogListInLabel[i]
        no, cx, cy, boxNP, (xb, yb, wb, hb) = contLabelAttr[labelNo]
        pt1 = (xb, yb)
        pt2 = (xb + wb, yb + hb)
        pttxt = (pt1[0] + recogNoList[0]["pos1X"], pt1[1] + recogNoList[0]["pos1Y"]-10)	# 画像全体の座標に変換
        cv2.putText(imgThreshColor, strNo, pttxt, font, 0.7, (0, 0, 255), 2, cv2.LINE_AA, False)
        for j in range(len(recogNoList)):
            ptg1 = (pt1[0]+recogNoList[j]["pos1X"],  pt1[1]+recogNoList[j]["pos1Y"])		# 入力全体座標に変換
            ptg2 = (pt1[0]+recogNoList[j]["pos2X"],  pt1[1]+recogNoList[j]["pos2Y"])		# 入力全体座標に変換
            cv2.rectangle(imgThreshColor, ptg1, ptg2, (255, 255, 0), 2)	# 認識文字をブルー囲む

    cv2.namedWindow('detectLabelContours', cv2.WINDOW_AUTOSIZE)
    cv2.imshow('detectLabelContours',imgColor)
    cv2.moveWindow('detectLabelContours', 650,0)

    cv2.namedWindow('Result', cv2.WINDOW_AUTOSIZE)
    cv2.imshow('Result',imgThreshColor)
    cv2.moveWindow('Result', 650, 540)		#Display = 1920 x 1080

    cv2.namedWindow('imgGray', cv2.WINDOW_AUTOSIZE)
    cv2.imshow('imgGray',imgGray)
    cv2.moveWindow('imgGray', 1350, 0)		#Display = 1920 x 1080

"""メイン関数"""
if __name__ == '__main__':

    while(True):
        # カメラからの画像をキャプチャして表示
        ret, frame = cap.read()
        cv2.namedWindow('VIDEO', cv2.WINDOW_AUTOSIZE)
        cv2.imshow('VIDEO', frame)
        cv2.moveWindow('VIDEO', 0, 540)
        k =  cv2.waitKey(1) & 0xFF
        if k == ord('q'):
            print("QUIT")
            break
        elif  k == ord('d'):	# 文字検出
            print("\n-- Start Detect Label ---------------------------------------")
            imgGray, imgThresh = transImage(frame)		# 解析用の画像変換
            allContours, contLabelAttr = detectLabelContours(imgThresh)
                # ラベル輪郭の検出(ラベルサイズの条件に合う輪郭データリストを得る)imgGrayは検出に使ったグレースケール画像
                    # allContours: 検出したすべての輪郭データ(原画に表示)
                    # contLabelAttr = [[ no, cx, cy, boxNP, boundR],.......]
                    # no:Label輪郭番号、(cx,cy):重心、boxNP:輪郭矩形4コーナー座標、boundR=(xb, yb, wb, hb)
            recogListInLabel = []
            if len(contLabelAttr) > 0:		# ラベルを1個以上検出した場合
                print("Number of Detected Label =====", len(contLabelAttr))
                for lblNo in range(len(contLabelAttr)):
                    imgThreshLabel = cutImgLabel(contLabelAttr[lblNo], imgThresh)	# ラベル画像(2値化)を切り出し
                    mojiRectList = detectMojiFromLabel(imgThreshLabel, 0.15, 0.2)
                        # ラベル内の文字輪郭検出、両端の無効部分(outX:15%, outY:20%)
                        # mojiRectList=[[ptj1(x,y), ptj2(x,y)],.......]=認識文字のローカル座標
                    if len(mojiRectList) > 0:	# 文字輪郭がある場合
                        strNo, recogNoList = recognizeNumber(mojiRectList, imgThreshLabel)
                            # strNo:認識した複数の数字(str型)、
                            # recogNoList:検出数字リスト(左から順に)、Dict型{"pos1X", "pos1Y", "pos2X", "pos2Y", "No"}
                        print("Recognized Number = ", strNo)
                        recogListInLabel.append([lblNo, strNo, recogNoList])
            else:
                print("NG! 認識ラベル無し")
            drawResult(allContours, contLabelAttr, recogListInLabel, frame, imgGray, imgThresh)
        else:
            continue
    cap.release()
    cv2.destroyAllWindows()
<実行結果>
文字認識は瞬時に終わるので、MLPモデルとCNNモデルで認識時間に実感できる差はない。
認識結果を示すグレースケールの画像で、緑の線はラベル白い部分の外形矩形、赤の線は、ラベルの回転を考慮した外形矩形、ブルーの線は文字輪郭外形矩形、赤字は認識した数字を表す。
<数字認識のための画像処理>
ラベルの抽出、文字認識は、OpenCVの「大津の二値化」を採用。一般的な閾値で二値化する方法より「大津の二値化」の方が、明暗差、コントラストの違いが大きい場合には、適切に二値化できた。